


Unlock Granular Control: Mastering GMC Custom Labels
Standard product categories got you feeling a bit restricted? In this blog I will talk about taking your Google Merchant Center feed to the next level. You know all about standard product categories, but what if you need to slice and dice your data in a more specific way? A bit limiting, right? Well, custom labels are here to break you free. With these labels, you can categorize your products in a way that makes sense for you, giving you super-granular control over your bids and targeting.
Custom labels let you group products based on things that matter to you, and then leverage that for laser-focused bidding and targeting. In this blog, I’ll walk you through each step with clear, easy-to-follow instructions. Whether you’re looking to segment your products for a seasonal campaign, highlight bestsellers, or manage inventory levels more efficiently, custom labels are the key to unlocking these possibilities.
By focusing on a specific case study,” How do I create Custom Labels using Feed Rules? I’ll explore the versatility and utility of custom labels in a real-world context, providing you with actionable insights and strategies that you can apply to your own Google Merchant Center account. This isn’t just about adding another tool to your digital marketing toolkit; it’s about enhancing your ability to reach the right customers with the right products at the right time, elevating your online presence and driving sales. Let’s dive in and explore how custom labels can revolutionize your approach to online retail.
What are Custom Labels?
Custom labels are attributes that you can add to your product data in your Google Merchant Center feed, providing a way to group products according to criteria that you define. These criteria can be anything from profit margins, seasonal relevance, best sellers, promotional items, to stock levels. Google allows you to define up to five custom labels for your products, named Custom label 0 through Custom label 4, each of which can be used to subdivide the products in a campaign for bidding and reporting purposes.
What are the benefits of using Custom Labels in Google Merchant Center feed
Custom labels are essentially tags you assign to specific elements within your campaign. This empowers you with greater control and optimization:
Enhancing Campaign Control
Custom labels provide valuable data for analysis. You can see which product categories convert better, have higher click-through rates, or require adjustments. This allows you to make data-driven decisions to improve campaign performance overall.
Basically this granular organization allows you to track performance more effectively and make informed decisions about where to allocate your budget.
Strategize Your Bids
Custom labels can be used to strategize your bids. You can set bids based on the label assigned, allowing you to prioritize certain campaigns, ad groups, or keywords for increased visibility. With custom labels, you can set different bids for various product groups. For example, you might increase bids for high-performing items (like “bestsellers”) or decrease bids for low-margin products. This ensures you’re spending your advertising budget more efficiently.
Product Segmentation
By assigning custom labels, you can segment your products based on specific criteria. This lets you tailor your bids and ad creatives to different product groups, potentially leading to higher conversion rates and return on ad spend (ROAS). By segmenting products with custom labels (e.g., “high margin,” “seasonal,” “clearance”), you can create more targeted ad groups. This makes it easier to track performance, optimize bids, and tailor your campaigns for better results.
How do Feed Rules in Google Merchant Center work
Google Merchant Center Feed Rules empower you to modify your product data according to your specific needs. Think of Feed Rules like conditions-based editing instructions for your product data.
Similar to how programmers use ‘if-then’ statements to control program flow based on certain conditions, Feed Rules allow you to define a condition. If a product meets that condition, the rule is applied. You can set specific conditions, and based on those conditions, apply changes to your product information. For instance, you can create a rule to add “Christmas Sale” to titles for all products from a particular brand during the holiday season.

When Should Feed Rules Be Used?
Use Feed Rules whenever you want to make sure your products stand out on Google. They help adjust your listings so they not only meet Google’s requirements but also catch more attention. Whether it’s adding important details Google wants, making your listings more appealing, or keeping your product information neat and tidy, Feed Rules is your go-to tool for making your products shine online
- Google needs more info or a different format: If Google asks for details in a way that’s not already in your product listings, Feed Rules can fix that easily. It’s like quickly tweaking a recipe to make sure it comes out just right.
- You want to make your listings stand out: Add extra useful details to your products, like special features or why they’re great, to catch more eyes. It’s a bit like adding sprinkles to a cake to make it more appealing.
- Decluttering for Clarity and Precision: Sometimes, listings get cluttered with information that doesn’t help sell the product. Use Feed Rules to clean up, keeping only the info that really matters. It’s like tidying up your room so the best things stand out.
What are some real-world examples of feed rules in action?
- Tailoring Product Titles for Visibility: If your product titles are missing crucial keywords, like a specific feature or attribute, you can use a Feed Rule to include it. For a product initially listed as “Ultra-Comfort Mattress,” and you notice searches for “memory foam,” a Feed Rule can modify the title to include this sought-after feature: “Ultra-Comfort Memory Foam Mattress.”
- Refining Product Descriptions: If your product descriptions include terms that Google doesn’t allow, such as “lifetime guarantee,” you can set up a Feed Rule to eliminate these phrases, ensuring your listings adhere to Google’s guidelines.
- Organizing Products by Price Categories: A smart use of Feed Rules is to apply custom labels for price segmentation. This can be particularly helpful for a retailer grouping their offerings into price categories like $0-$50, $50-$100, and over $100, facilitating targeted campaign management based on price range.
What are important key Considerations for Utilizing Feed Rules?
Strategic Planning with Single Rule per Attribute
Feed rules require that each attribute is associated with a single rule. This limitation underscores the need for strategic planning. When multiple changes to an attribute are necessary, they must be integrated into one comprehensive rule. This ensures all desired modifications are applied without conflict, akin to perfecting a recipe with each ingredient added at just the right moment.
The Cascading Effect of Feed Rules
Feed rules are applied sequentially, creating a cascading effect where the order of rule application is critical. This sequential layering ensures that each rule builds upon the previous, emphasizing the importance of rule order in achieving the desired outcome for your feed.
Leveraging Default Rules for Baseline Functionality
Default rules serve as the foundation for any customizations you apply. They ensure a baseline functionality by automatically sourcing attribute values from either a primary or supplementary feed. Understanding these default settings is essential for effective feed customization.
Bulk Modifications: Efficiency and Consistency
Designed for large-scale changes, feed rules excel at making bulk modifications. This approach not only saves time but also ensures consistency across your product feed, making it ideal for widespread updates.
Selecting the Right Data Source
Choosing the appropriate data source is a critical first step in configuring your feed rules. This decision impacts the base data for an attribute, affecting the overall outcome of the rule. Options like “Set to,” “Extract,” and “Take latest” offer a versatile toolkit for directing how data populated your feed attributes.
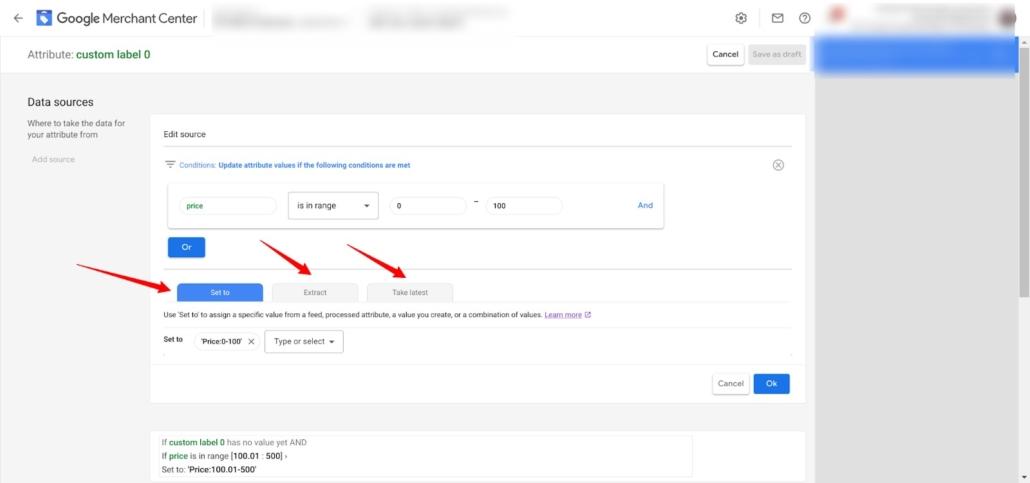
- Set to.: This is where you define a specific value for the custom label based on conditions that are met. You would typically use this to categorize or label your products dynamically. For example, you might set this to “Price:0-100” to label all items within that price range.
- Extract: This option allows you to extract values from the product data submitted in your feed. You can use it to create a new value for your custom label based on existing information in your product feed.
- Take latest: This option that if there is more than one potential value that could be applied to the custom label based on the rules you set, the system will take the latest or most recent value. This can be useful when you have multiple rules that might overlap, ensuring that the most recent rule applied takes precedence.
What are Modification Techniques for Optimizing Product Feeds?
Sometimes, adding values isn’t enough; you might need to change existing ones. The changes you see in the Google Merchant Center will vary depending on the attributes you’re editing, so you may not see every option mentioned here.
As you can see the Google merchant center feed page in the given image. This page allows you to modify the data in your product feed before it is submitted to Google. There are three main types of modifications that you can make.
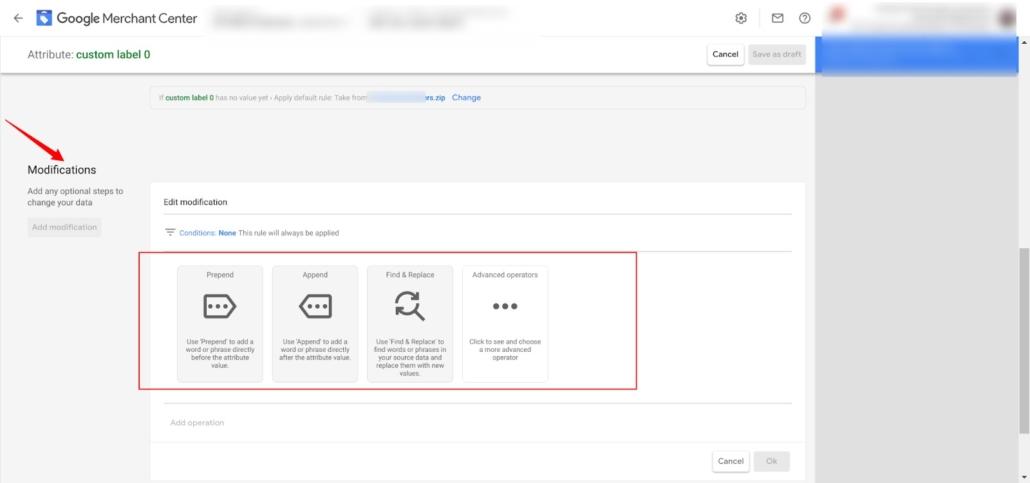
Enhancing Attributes with “Prepend and Append”
Prepending and appending provide valuable methods for adding context or branding to product titles or descriptions. Whether it’s incorporating promotional tags at the beginning or brand names at the end, these techniques help improve visibility and brand recognition in search listings.
Achieving Consistency with “Find and Replace”
The find and replace modification ensures your feed’s consistency and accuracy. It’s ideal for correcting common misspellings, updating terminology, or aligning product names with popular search terms, enhancing product discoverability.
Dynamic Adjustments through “Calculation”
Calculations allow for dynamic adjustments to numerical values within your feed. This modification is crucial for updating prices or other numeric attributes, ensuring your feed remains accurate and relevant.
Testing: The Final Step Before Implementation
Before implementing any feed rule, testing is essential. This verification step ensures the rule functions as intended without introducing errors. Careful testing and application of your rules can significantly enhance the quality and performance of your product feeds.
By adhering to these considerations and utilizing the modification options effectively, you can optimize your product feeds to meet both Google’s standards and your marketing goals.
How Can You Address Low-Quality Feeds with Feed Rules?
However, feed rules are extremely valuable for improving the quality of your primary feed before segmentation:
- Standardization: Enforce consistent formatting across your entire feed. This includes things like capitalization (all lowercase, title case, etc.), units of measurement (inches vs centimeters), and how attribute values are phrased (e.g., “Color: Red” vs. “Red”).
- Error Removal: Identify and eliminate products with missing essential attributes or data that don’t follow the format you set. This ensures your feed is clean and avoids errors during processing.
- Description Boost: Use rules to combine information from different attributes to create more informative product descriptions. This can improve user experience and boost conversions.
By cleaning and enhancing your primary feed with feed rules, you lay the groundwork for accurate segmentation using alternative methods.
How can feed rules help me save time managing my Google Shopping listings?
Feed rules are used to transform your product data in your Merchant Center feed to meet Google’s specifications or to enhance your data for advertising purposes without altering your original website’s product data. Using feed rules to create custom labels is particularly useful for:
- Automation: Feed rules eliminate the need for manual updates to your product data. You can set rules to automatically adjust prices, titles, or descriptions based on predefined criteria. This saves time and ensures your ads always reflect the latest information.
- Dynamic Management: Feed rules allow you to dynamically adjust your product data based on various factors like stock availability, promotions, or competitor pricing. This ensures your ads are always competitive and relevant.
- Performance Optimization: By tailoring your product data with feed rules, you can optimize your ad performance.
What are the Ideal-Situations to Choose Supplemental Feeds Over Feed Rules?
Deciding whether to use Feed Rules or Supplemental Feeds in Google Merchant Center can seem daunting, but it boils down to understanding the nature of the adjustments you need for your product data. Both tools offer unique advantages for different types of edits, helping you optimize your product listings for Google Shopping. Here’s a straightforward guide to choose Supplemental Feed for specific edits:
- Applying GTINs (Global Trade Item Numbers): Supplemental Feeds are ideal. Since GTINs are crucial for product identification and visibility, adding them through Supplemental Feeds ensures your products are accurately matched in Google’s system, enhancing their discoverability.
- Embedding Keywords for SEO: Choose Supplemental Feeds. If you’re aiming to improve your product’s visibility through search engine optimization, incorporating relevant keywords into your titles or descriptions is key. Supplemental Feeds allow you to enrich your original product data with SEO-friendly terms without altering the primary feed, thereby boosting your products’ searchability.
- Excluding Items: Supplemental Feeds are your go-to option. For tasks like removing certain products from Google Shopping.
- Applying Promotional Codes:, Supplemental Feeds provide the flexibility to tagging products with promotional codes for special offers.. This method allows for targeted adjustments without needing to modify the entire feed, making it easier to manage promotions.
How do I use Supplemental Feeds in Google Merchant Center?
Supplemental feeds in Google Merchant Center allow you to provide extra product information beyond what’s in your main feed. This helps optimize your listings and improve performance.
Let’s say you sell clothing online. Your main feed includes basic details like product names, prices, and sizes. With a supplemental feed, you can add specific attributes like fabric type, care instructions, and unique selling points for each item. This additional information can make your listings more appealing to shoppers and increase your chances of making a sale.
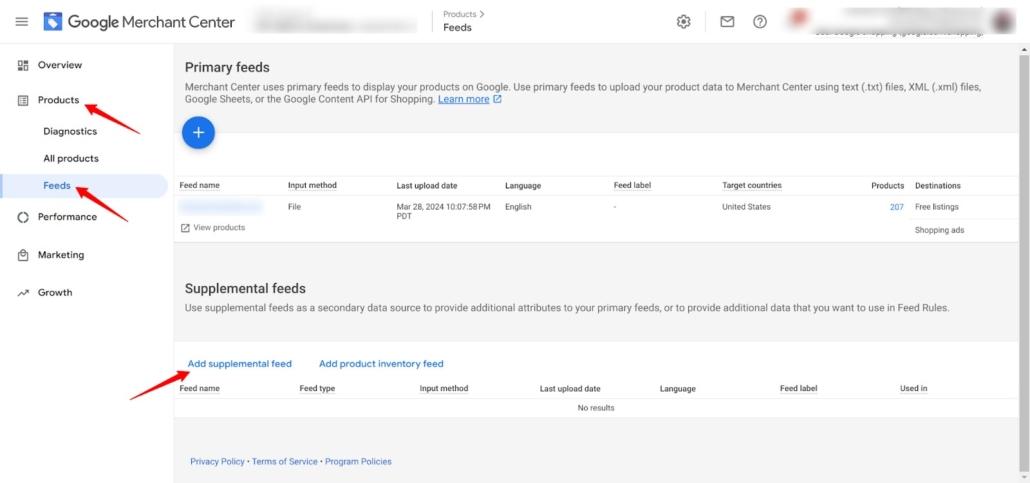
In Google Merchant Center, navigate to Products > Feeds (new) and click “Add supplemental feed.”
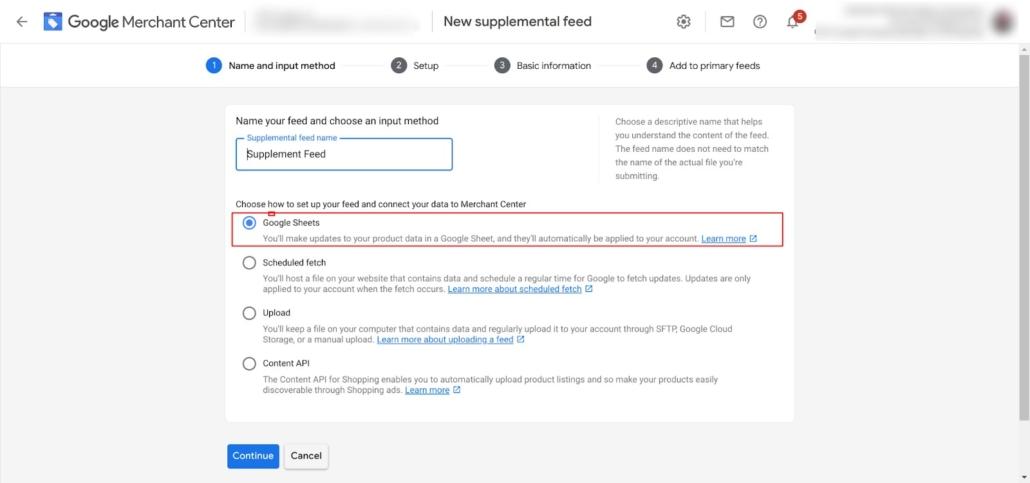
After clicking on the add supplemental feed you will see the screen where you can fill the Name your Supplement feed,
After that choose an existing Google Sheet or create a new one.
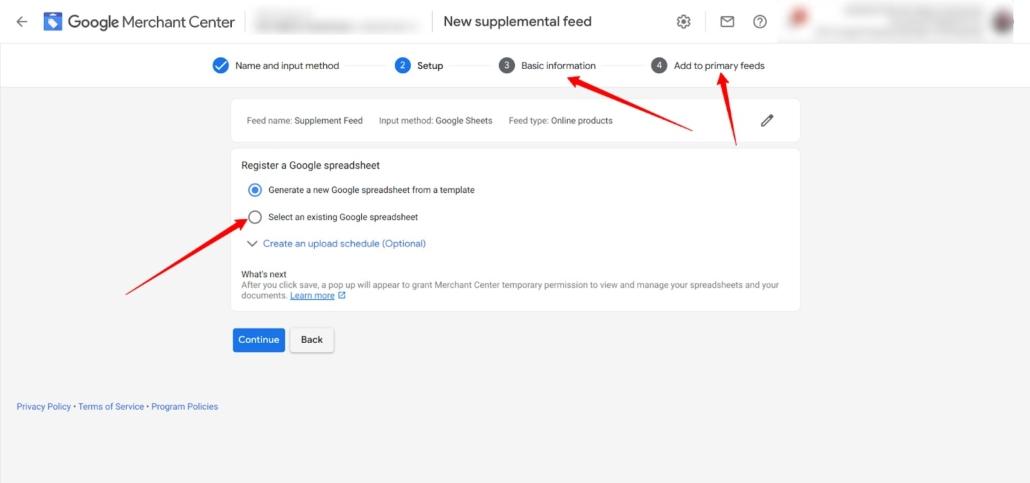
and click “Continue” to grant Merchant Center temporary access to your spreadsheets for managing the feed. Click on “Continue” to proceed.
Case Study: Utilizing Custom Labels for Products Grouping
Introduction:
This case study explores how targeted advertising strategies can be achieved for electronic products using Google Merchant Center feed rules and Google Ads Shopping campaigns. I will focus on real-world implementation, analyzing the role of the red arrows you provided in the screenshots. This will showcase the process of creating custom labels with feed rules to categorize electronic products based on price, ultimately leading to a more segmented advertising approach.
Objective:
The primary goal is to establish a segmented advertising strategy. By categorizing electronic products based on price ranges (using custom labels), we aim to achieve:
- Bidding: Optimize bids for each price segment, maximizing return on ad spend (ROAS).
Process Overview:
Our journey begins within the Google Merchant Center product feed page under Products tab. Here, we’ll utilize feed rules to categorize electronic products based on their price points.
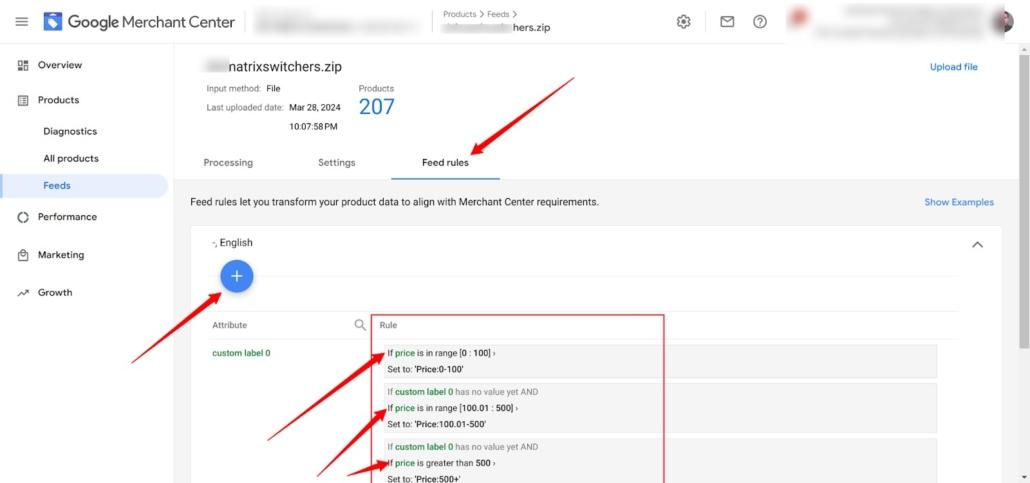
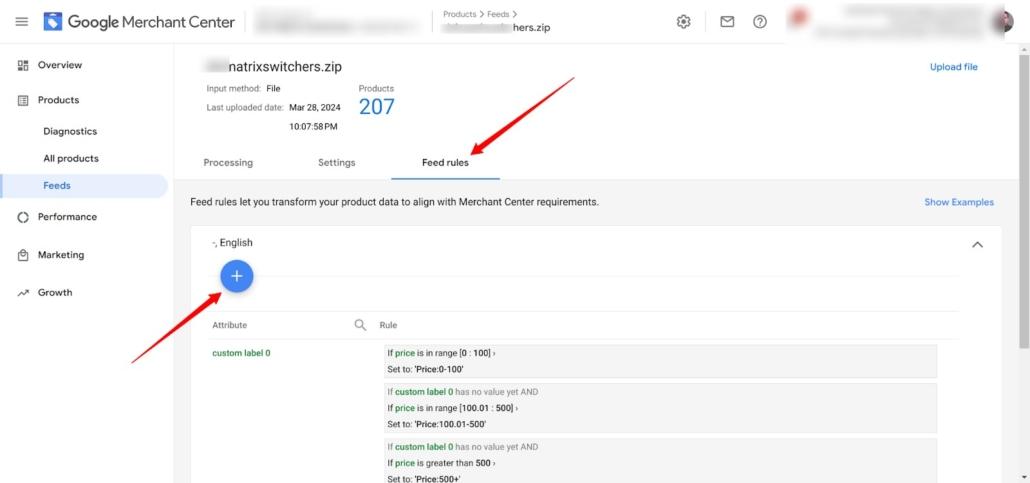
When you’re in Google Merchant Center and click on ‘Feeds’ within the ‘Products’ tab, you’ll see your dashboard, just like in the screenshot.
Here, ‘Feed rules’ is your go-to spot for customizing product listings.
Hit the ‘+’ to add a new rule, select an attribute to modify, and define the conditions – like setting price ranges. Choose the outcome, save, and you’ve tailored your product’s online showcase with just a few clicks!

Creating Feed Rules on the Basis of Price Range or Price Brackets
At the Google Merchant Center feed, you’ll find yourself looking at a console similar to what’s depicted in the screenshot. To begin crafting your feed rules, you’ll hit the ‘+’ sign to spark the creation of a new rule. Then, you’ll select which aspect of your product data you want to tweak, like a price range or label.
When you’re at the Google Merchant Center feed and want to refine your product data, the ‘Processed attributes’ option seen in the screenshot is where you make this happen. Clicking the ‘+’ button opens the door to customizing your feed rules.
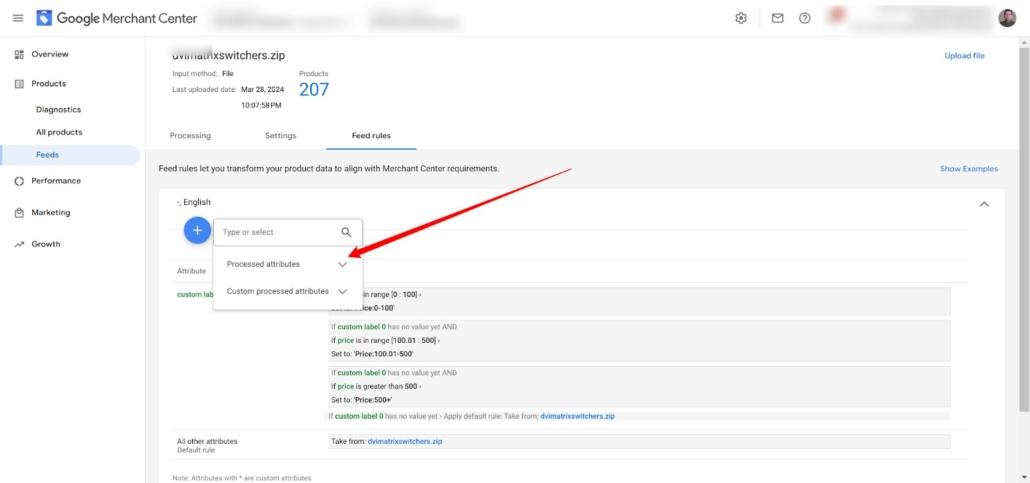
Here, under ‘Processed attributes,’ you select a particular attribute you want to modify—think of it as choosing a product feature to update, like its ‘custom label’ or ‘category.’ I have selected the ‘Processed attribute to create a rule for.
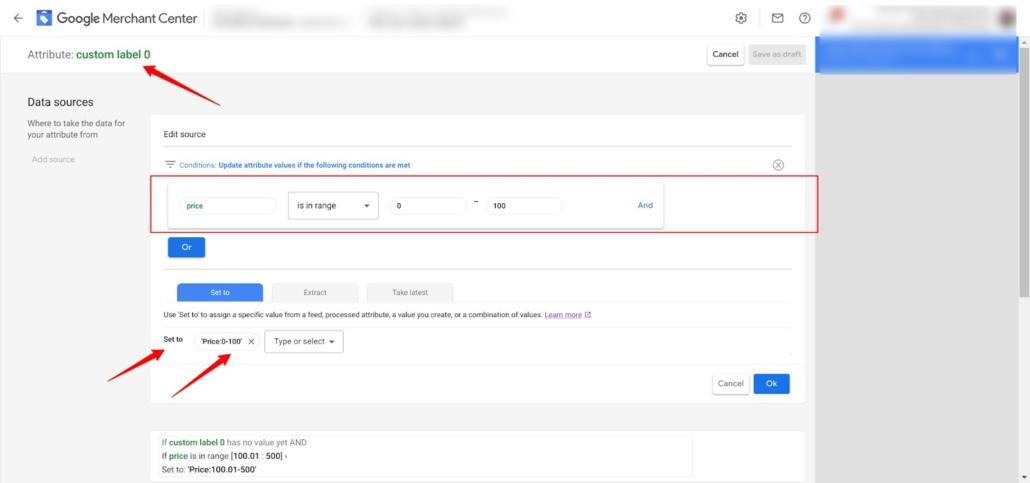
Once selected an attribute, you’ll be prompted to define the specific conditions for it, such as ‘price is in range 0 – 100’.
After setting conditions, need to specify what I want to happen when those conditions are met—for example, labeling the product with ‘Price:0-100’.
With attributes selected and rules set, will save your changes, thus instructing the feed how to display and categorize your products based on the criteria you’ve established.
After setting the conditions your product must meet, you’ll decide what happens when those conditions are met. With the final touch of the ‘Save’ button, your product listings are now customized, all with a few simple clicks!
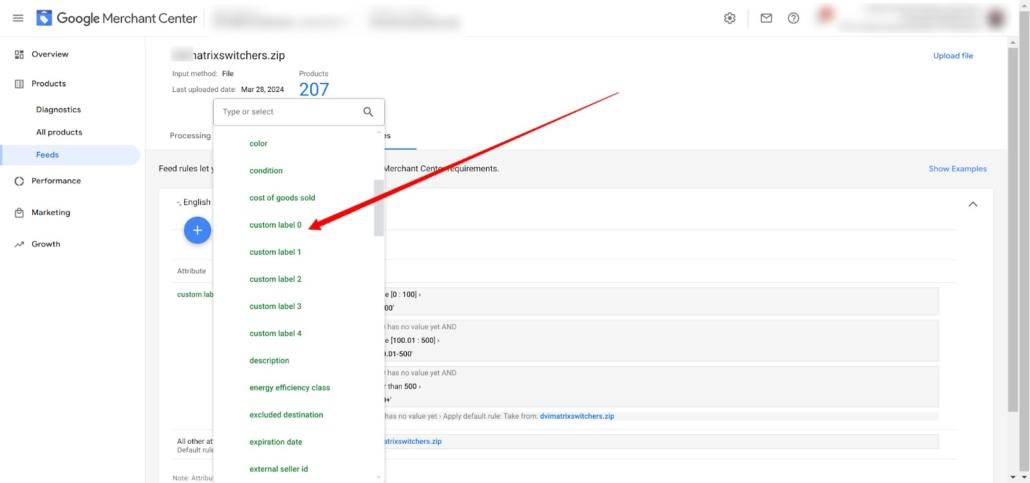
In the screenshot from the Google Merchant Center feed, when you want to tailor how your products are organized, ‘custom label 0‘ is your focus under ‘Processed attributes’.
By selecting ‘custom label 0’, you can create rules that segment your products in a way that aligns with your marketing strategy.
In the Google Merchant Center feed, once you’re at the stage depicted in the screenshot and have chosen ‘custom label 0’ under ‘Processed attributes’, you’re ready to define the specifics of your feed rule.
With ‘Set to’, you assign a value that the ‘custom label 0’ will carry whenever the defined conditions are met.
For example, if the price falls within a certain range, you can label the product as ‘Price:0-100’, enabling you to categorize and manage your products with greater precision. This labeling is particularly useful for organizing your products for promotions, reporting, or bidding in Google Ads.
Setting Up Custom Labels for Price-Based Product Segmentation in Google Merchant Center
This screenshot zooms in on the feed rules setup.
After setting ‘custom label 0’ in the Google Merchant Center feed, I have implemented a structured approach to product categorization through defined conditions.
By using the ‘Set to’ function, we can establish how each product is labeled based on its price point.
In the screenshot, I’ve outlined rules within the Google Merchant Center to sort my items by price.


Products priced from $0 to $100 are now grouped with the label ‘Price:0-100’, clearly identifying the most affordable options. Items priced between $100.01 and $500 are tagged ‘Price:100.01-500’, which helps me to distinguish mid-range offerings.
Moreover, anything priced above $500 is categorized as ‘PriceGroup:500+’, isolating these for targeted high-value promotions.
Applying these labels methodically is crucial for structuring my product lineup and ensures targeted precision in my Google Ads campaigns, allowing me to tailor my marketing efforts and effectively manage my advertising budget across diverse product categories.
Here’s a table summarizing the segments:
| Price Range | Custom Label Value |
| Less than $100 (incl.) | Price:0-100 |
| $100.01 to $500 (incl.) | Price:100.01-500 |
| $500.01 and above (incl.) | PriceGroup: 500+ |
How to check if the Feed Rules Applied Correctly in GMC
After setting up feed rules in Google Merchant Center, it’s important to check if they’re working correctly. To do this, go to GMC and look for the ‘All products’ section, which looks like the screenshot.

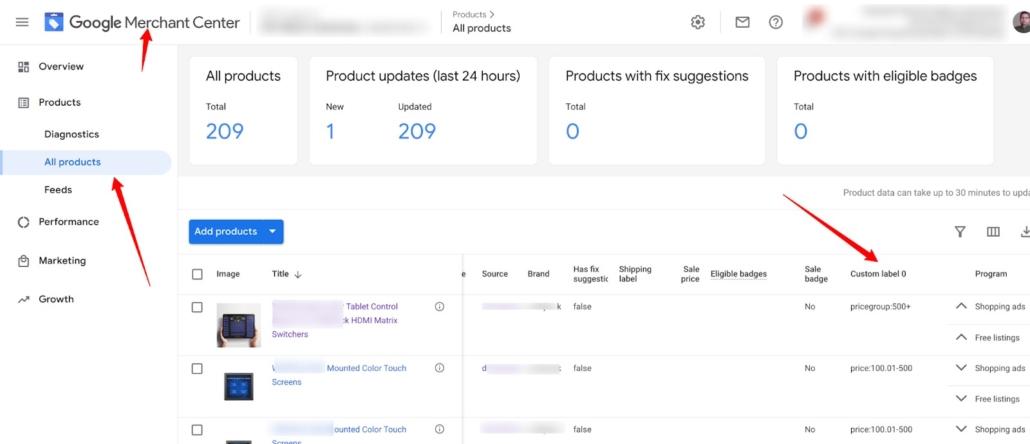
Here, you’ll see a list of all your products. Check the column labeled ‘Custom label 0’ (or similar) to see if your rules have been applied. For example, as I have set up rules based on price ranges, I will be able to see products labeled accordingly, making it easy to confirm that your feed rules are doing their job properly.
How to Create Product Groups in Google Ads Based on Custom Labels
Head over to Google Ads and choose ‘Campaigns,’ then filter for your Google Shopping campaign. From there, navigate to ‘Ad Groups’ and select ‘Product groups.’
Here you should create or select the relevant product group that matches your custom labels from GMC, such as ‘Price:0-100’ or ‘PriceGroup:500+’.
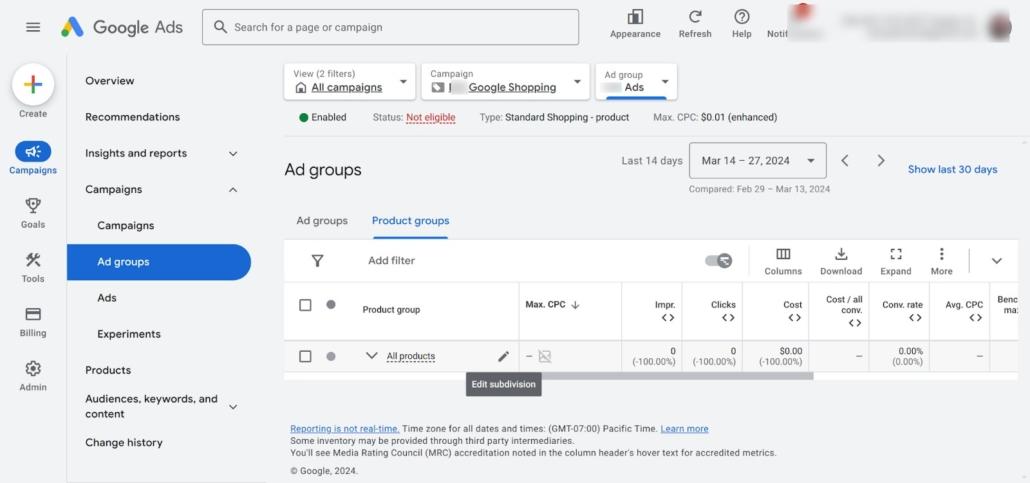
This will let you see if products are correctly categorized according to the rules you’ve set, enabling you to manage your ads with precision.
Now Continue to edit the bids
After setting your feed rules in the Google Merchant Center and heading over to Google Ads, you’ll find the screen as shown in the screenshot. At this stage, ensure you’re in the ‘Product groups’ section of your Shopping campaign.
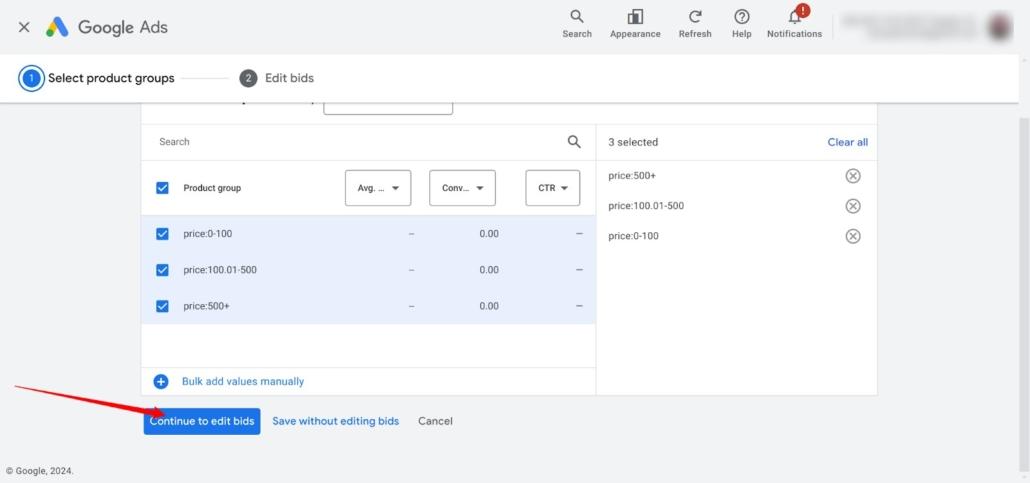
Here, you select product groups that correspond to the custom labels like ‘price:0-100’, ‘price:100.01-500’, and ‘price:500+’ defined in your feed. Once selected, you can proceed by clicking on ‘Continue to edit bids’ to fine-tune your bidding strategy for each product group, optimizing your ads based on the price segmentation created by your feed rules.
After navigating to the ‘Edit bids’ section within Google Ads Shopping campaign, as seen in the below screenshot, you can adjust bids according to your product price segmentation.

The above screenshots illustrate how I’ve fine-tuned the bidding process. I’ve opted to exclude the lower-priced products, those in the ‘price:0-100’ range, to allocate budget more efficiently. And in the below screenshot for the mid-range ‘price:100.01-500’, a bid of $0.40 has been set,
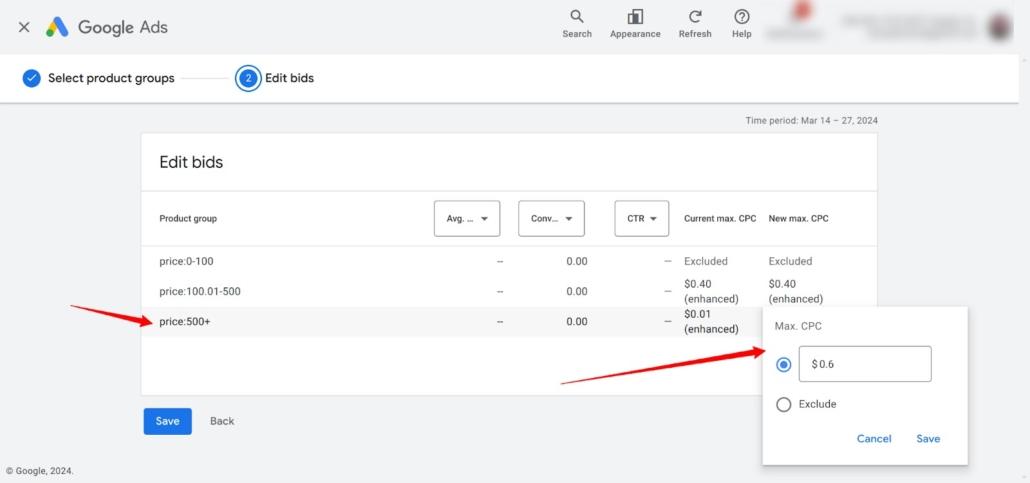
and for the higher-value items ‘price:500+ the bid is increased to $0.60. This approach ensures that the more expensive, potentially higher-margin items receive more visibility, thus increasing the chances of higher traffic and conversion rates. Your Google Ads setup now reflects a clear tiered bidding structure that aligns with your strategic goals.
In the final screenshot of Google Ads setup, you can see and confirm that the bid adjustments are reflecting accurately under the ‘Product groups’ section.
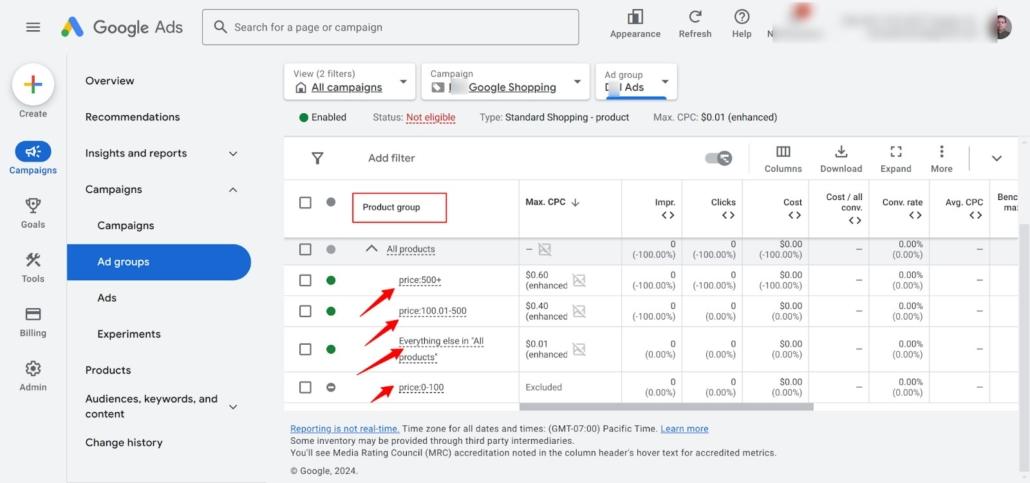
Each product group—’price:0-100′, ‘price:100.01-500’, and ‘price:500+’—shows the respective bid you’ve assigned. Products in the ‘price:0-100’ group are excluded, meaning they won’t show in ads, directing focus and budget to the other groups.
The ‘price:100.01-500’ group has a moderate bid of $0.40, while the ‘price:500+’ group has the highest bid at $0.60, targeting higher traffic and conversion for high-value items.
This tiered structure is now set to go live, aiming to maximize ad spend effectiveness and conversion potential.
Custom labels and product groups allow advertisers to manage their bids and tailor their advertising strategy based on specific characteristics of their products. For example, you may want to bid more aggressively on higher-priced items that have a higher profit margin, or perhaps focus on a particular price range during a sale. It also provides the flexibility to analyze performance data at these segmented levels and make more informed decisions on where to allocate advertising budgets.
Takeaway
Custom labels in Google Merchant Center are here to break you free! Think of them as tags you can add to your products, letting you group them based on what matters to you. This unlocks a whole new level of campaign control. See which products are rockstars, which ones need a little more love, and adjust your bids and ad strategies accordingly. Plus, you can automate the whole process with feed rules – no more manual updates needed! Custom labels are basically superpowers for your Shopping campaigns, making them more efficient and effective. That’s a wrap on our deep dive into custom labels. With this guide, you’re well on your way to leveraging Google Merchant Center’s feed rules for a more targeted and successful shopping campaign strategy.
About Author:
Subhash Jain and his team at Samyak Online specialize in Google Shopping Ads, offering expertise in Custom Labels Using Feed Rules in the Google Merchant Center. With our focused approach on Query-Level Bidding and Custom Labels, we ensure your campaigns are optimized for efficiency and targeting precision. Ready to propel your brand forward? Partner with Samyak online google ads experts to unlock the full potential of Custom Labels Using Feed Rules in the Google Merchant Center. Reach out today to elevate your Google Shopping campaigns and achieve online success.